
Disclosure: I am a SmugMug affiliate. If you purchase a plan through my links I receive a small commission at no extra cost to you.
If you’re a photographer with a SmugMug website and you’ve been wondering whether you can add a blog on Smugmug, the short answer is yes — but it’s not quite as straightforward as you might expect. SmugMug doesn’t have a dedicated blogging platform like WordPress does. There’s no “write a post, hit publish” button. No categories, no tags, no RSS feed. For anyone used to the WordPress editing experience, that might sound like a dealbreaker.
But here’s the thing: SmugMug is first and foremost a platform built for photographers, and for most photographers it does its core job brilliantly. If you want to add a blog to your SmugMug site without jumping ship to a separate platform, there is a solid workaround using SmugMug’s own built-in tools — folders and pages. It takes a little more effort to set up than a WordPress blog, and you’ll be building each post more or less from scratch, but the results look clean and professional, it costs you nothing extra, and everything lives neatly within your existing SmugMug site.
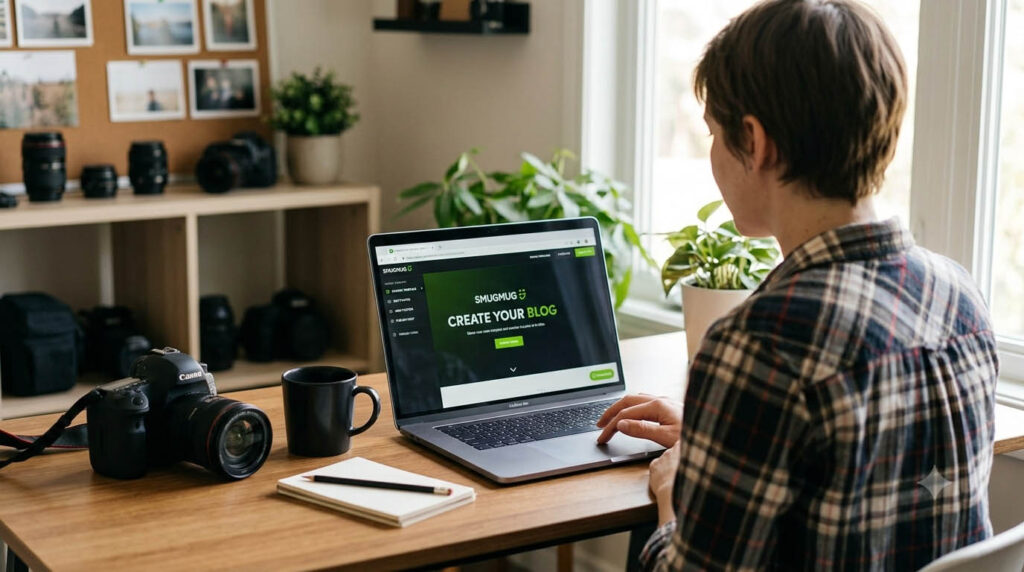
I’ve put together this guide to walk you through exactly how to do it. I’ve also made a video walkthrough if you prefer to follow along visually — you can find it here. For those who prefer written instructions, everything you need to know is below the video.
Before You Start – What Plan Do You Need?
You will of course require a Smugmug plan. If you are not already signed up, you have a choice between Direct, Portfolio, or Pro plan. Smugmug offers a no obligation 14-day trial (no credit card required).
Not on SmugMug yet?? You can Save 15% off any new SmugMug account when you click my affiliate link.
No coupon needed, just click the link and sign up for the trial. Should you choose to take up a plan after, the discount will be automatically applied.
SmugMug Blogging vs WordPress – What's the Difference?
It’s worth being upfront about this before you dive in. WordPress is a purpose-built content management system — it has a dedicated post editor, automatic post archiving, categories, tags, comments, RSS feeds, SEO plugins, and virtually unlimited flexibility. It’s the gold standard for blogging.
SmugMug is not trying to compete with that, and doesn’t pretend to. What it offers instead is a single, clean platform where photographers can host their galleries, sell prints, and build a professional-looking website — all without needing to manage plugins, updates, or security patches. If that sounds appealing, it is. The trade-off is that features like blogging require a workaround rather than a native tool.
Here's how the two compare for blogging specifically:
| Feature | SmugMug (workaround) | WordPress |
|---|---|---|
| Blog posts | Pages inside a folder | Native post editor |
| Post templates | No (recreate each time) | Yes (block templates, theme layouts) |
| Categories / Tags | No (use subfolders as workaround) | Yes |
| RSS feed | No | Yes |
| Scheduled publishing | No | Yes |
| Comments | Yes (via content block) | Yes (native + plugins) |
| SEO control | Basic | Advanced (Rank Math Yoast, AIOSEO, etc.) |
| Photo integration | Excellent | Requires plugins |
| Maintenance required | None | Yes (updates, security, backups) |
For many photographers who just want to share behind-the-scenes content, session write-ups, or photography tips alongside their galleries, the SmugMug approach is more than good enough. You just need to know what you’re getting into. If blogging is going to be a central part of your business or marketing, you might want to consider a separate WordPress blog — or a fully integrated solution. Feel free to get in touch with me to chat through the options.
How SmugMug Blogging Works – The Basic Concept
SmugMug doesn’t have a “blog” section, but it does have two building blocks that can do the same job:
Folders behave like a blog landing page. They display all the pages inside them as a visual grid of thumbnails — just like a blog archive page.
Pages behave like individual blog posts. You build each one using content blocks — a featured image, a title, body text, and optionally a comments section.
Together, they create a fully functional blog that sits completely within your SmugMug site. Let’s build one.
Step 1 – Create Your Blog Folder
The Blog folder is your landing page. It will display all your posts as thumbnails and serve as the entry point for visitors.
Log in to your SmugMug account and click Organizer in the top navigation bar.
Make sure you’re in the Photo Site Homepage section — this is the root of your website.
Click + Create and select Folder from the dropdown.
In the popup, fill in:
Name: Blog (simple and clean, this will form your URL — e.g. yoursite.com/blog)
- Description: A short, keyword-rich sentence about your blog for SEO purposes
- Keywords: Relevant terms for your content
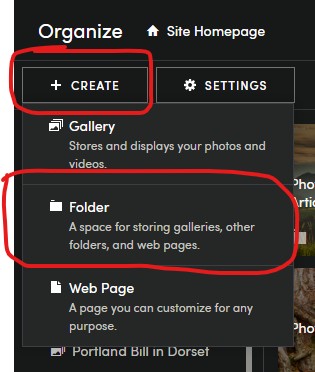
Click Create to save.
SEO tip: Keep the folder name simple. A short URL like /blog is easier for visitors to remember and better for search engines than something like /my-photography-thoughts-and-stories.
Step 2 – Set Up a Gallery for Your Blog Photos
Pages in SmugMug cannot hold photos directly — you need a separate gallery to store the images you’ll use in your posts. Here’s how to set that up without it cluttering your blog landing page.
- Navigate back to the root of your site (Photo Site Homepage) in the Organizer.
- Click + Create and select Gallery.
- Name it something like Blog Photos.
- If you don’t want this gallery to visible in your main galleries page (IE, alongside all your galleries) mark it as unlisted (Anyone with a link).
- Use the Organizer tree to drag the gallery so it sits close to your Blog folder — but crucially, keep it outside the Blog folder.
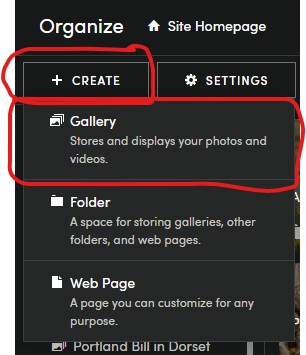
Important: If you put the Blog Photos gallery inside your Blog folder, it will show up as a post on your blog landing page. Keep it outside.
Step 3 – Create Your First Blog Post
Each post is a SmugMug Web Page inside your Blog folder. You’ll repeat this process every time you want to publish something new.
- In the Organizer, open your Blog folder.
- Click + Create and select Web Page.
- When prompted to choose a layout, select Custom (this gives you full control) or Horizontal (a good pre-built option for blog posts).
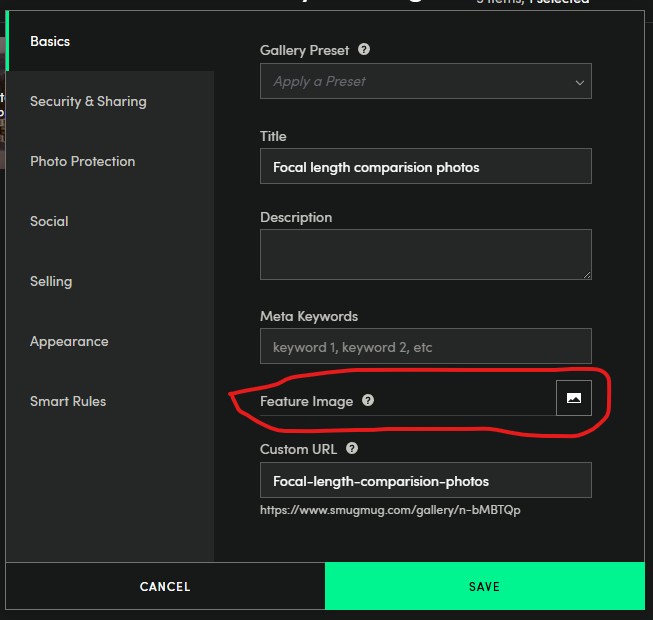
- Fill in the page settings:
- Title: Your post headline
- Description: A short summary of the post — this is what appears in search results, so make it count
- Featured Image: This is the thumbnail that will appear on your blog landing page
- To add a featured image, click the image icon next to Featured Image. If you see a message saying there are no images available, click the home link in the breadcrumb at the top of the picker to navigate to your galleries. Select your image from the Blog Photos gallery you created.
- Click Create to save your post.
Step 4 – Build Your Post Layout
Once the page is created, click View This Page, then Customize in the top right corner. This is where you build the actual layout of your post.
Add a Feature Image
Open the Photos section in the right-hand content block panel. Drag the Single Photo block onto your page, positioning it below the breadcrumb. Select your hero image.
Add a Title
From the Text section, drag the Title block below your featured image. This automatically pulls through the page title you set in Step 3.
Add Your Post Content
Drag a Text block below the title. Click into it to open the text editor and write your post. You can format text, add links, and drop in additional photos.
Optional: Add a Comments Section
If you want readers to be able to comment on your posts, open the Social section and drag the Comments block to the bottom of the page. It’s a nice touch and can help engagement.
Tidy Up the Breadcrumbs (Optional)
The default breadcrumb styling emphasises the current page in a way that can look a bit heavy. To fix this, hover over the Breadcrumb block, open its settings, and turn off Emphasize Current Page for a cleaner look.
Publish
Click Done, then Publish to make your post live.
Step 5 – Add Your Blog to Your Site Navigation
Once your Blog folder is set up and you have your first post live, make sure visitors can actually find it.
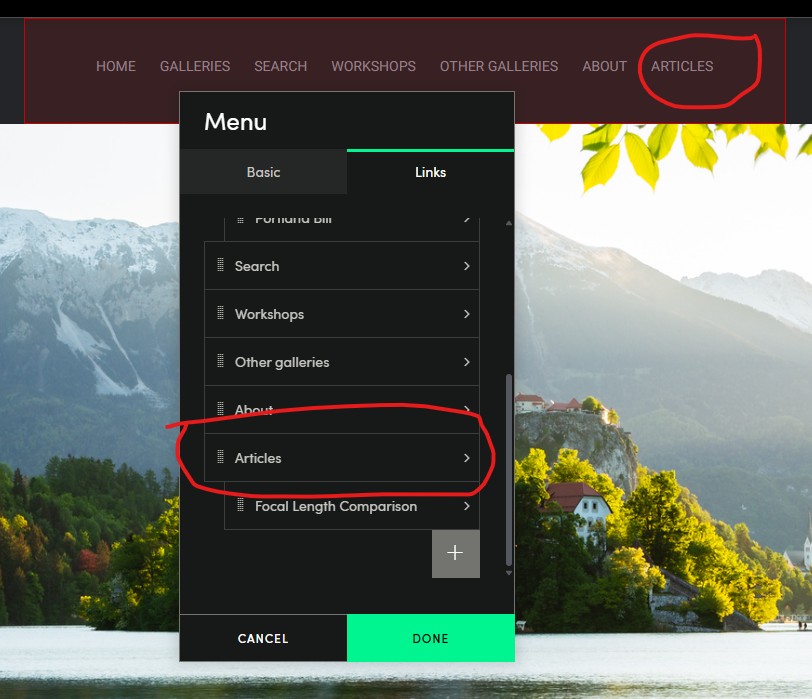
- Go to Customize on your SmugMug site.
- Click on your site’s navigation menu.
- Add a link to your Blog folder and label it “Blog or Articles” or whatever you want.
This is a basic but essential step that’s easy to overlook when you’re focused on building content.
Step 6 – Writing Future Posts
For each new post, you’ll repeat Steps 3 and 4:
- Open your Blog folder in the Organizer.
- Create a new Web Page.
- Add your title, description, and featured image.
- Build the layout using content blocks.
- Publish.
Since there are no templates, you’ll be rebuilding the layout each time. A practical workaround is to keep a reference post open in another tab and recreate the same block order — that way your posts stay visually consistent.
SEO Tips for Your SmugMug Blog
SmugMug’s SEO tools are more limited than what you’d get with a WordPress plugin like Rank Math, but there’s still plenty you can do.
- Write a clear, keyword-focused title for every post. Think about what someone would type into Google to find that content.
- Fill in the description field for every post — this is your meta description and it directly affects how your post appears in search results.
- Add keywords to both the Blog folder and individual posts.
- Use descriptive image file names before you upload, and write descriptive alt text when adding images to posts.
- Keep your Blog folder URL short and consistent (e.g. /blog).
- Internal linking between posts and your main gallery or services pages will help both SEO and navigation. SmugMug allows you to add links within your text blocks.
For photographers serious about SEO, I also offer an SEO service for SmugMug websites if you’d like a professional to look at your site.
Frequently Asked Questions
SmugMug does not have a native blog feature in the same way that WordPress or Squarespace does. However, you can create a fully functional photography blog using SmugMug's built-in Folders and Pages. A folder acts as your blog landing page, and individual pages serve as your posts. It takes more manual work to set up than a dedicated blogging platform, but the results are clean and professional and everything stays within your SmugMug site.
Yes, you can blog on SmugMug — it just requires a workaround rather than a native blog tool. By creating a folder (as your blog archive page) and individual web pages inside it (as your posts), you can build a photo blog that works well for most photographers. Each post is built using drag-and-drop content blocks including featured images, titles, text, and optional comments. See the step-by-step guide above for full instructions.
Any plan will work for this. You have a choice between Direct, Portfolio, or Pro plan. Smugmug offers a no obligation 14-day trial (no credit card required).
You can Save 15% off any new SmugMug account when you click my affiliate link.
No coupon needed, just click the link and sign up for the trial. Should you choose to take up a plan after, the discount will be automatically applied.
SmugMug is a solid option for photographers who want a simple photo blog alongside their galleries and don't want to manage a separate website. It handles photos beautifully, keeps maintenance to a minimum, and everything lives in one place. That said, it lacks features that dedicated blogging platforms offer — there are no post templates, no categories or tags, no RSS feed, and no scheduled publishing. If writing and blogging is central to your business, WordPress will give you considerably more power. But for photographers who blog occasionally, SmugMug's workaround does the job extremely well.
Your SmugMug Blog folder can hold up to 5,000 pages (posts). For the vast majority of photographers, this is more than enough.
Yes. SmugMug includes a Comments content block that you can drag into any page layout. Simply open the Social section in the customisation panel and add the Comments block to the bottom of your post. This allows visitors to leave comments directly on your SmugMug blog posts.
Yes, you can embed YouTube videos into SmugMug pages. Use the Video content block in the customisation panel and paste in your YouTube URL. This makes SmugMug a good option for photographers and videographers who want to share behind-the-scenes footage or tutorial videos alongside written content.
SmugMug is a much simpler platform with fewer blogging features but far less maintenance. WordPress is more powerful for blogging — with categories, tags, templates, RSS feeds, scheduled posts, and a full plugin ecosystem — but it also requires ongoing management (updates, security, backups) and is more complex to set up. For photographers who want an easy, all-in-one platform with beautiful galleries, SmugMug is a great choice. For those who want a serious blog as part of their business, WordPress is the more capable option. See my comparison article Squarespace vs SmugMug for Photographers for more on choosing between platforms.
Yes, though your options are more limited than on WordPress. You can add a title, meta description (via the page description field), and keywords to each blog post. You can also add descriptive alt text to images and include internal links within your text blocks. For photographers who want better SEO for their SmugMug site, I offer a professional SmugMug SEO service.
This depends on your priorities. SmugMug is a purpose-built platform for photographers — it handles photo storage, galleries, print sales, and client delivery beautifully, with no technical maintenance required. WordPress is more flexible and more powerful for content-heavy sites, blogging, and advanced SEO, but requires more management. Many photographers use both: SmugMug for their galleries and portfolio, and WordPress for their blog. If you'd like advice on which setup is right for you, feel free to get in touch.
Yes — I offer a SmugMug website design service from £30 per hour, covering design, layout, SEO, and content. Contact me here for a quote and a free consultation.
Final Thoughts
SmugMug may not be WordPress when it comes to blogging, but for photographers who want a clean, low-maintenance way to share stories alongside their galleries, it’s a perfectly workable solution. The folder-and-pages approach takes a little getting used to, but once you’ve built your first post you’ll find the process straightforward.
If you haven’t tried SmugMug yet, it’s well worth considering — especially if you want one platform that handles your galleries, your portfolio, your print sales, and your blog all in one place. Use my link to get 15% off a SmugMug plan and give it a go.
If you get stuck or want a more polished result, my SmugMug design service is always there to help. And don’t forget to watch the video at the top of this page for a visual walkthrough of everything covered here.
